Dreaming of a brighter, more modern update for your dated brick fireplace? Whitewashing is a fantastic DIY project that can instantly breathe new life into your living space.
This comprehensive guide unveils the secrets to achieving a perfectly stunning whitewashed brick fireplace, covering everything from preparation and application techniques to troubleshooting and styling tips.
Get ready to learn how to enhance your home’s aesthetic with this timeless and transformative technique!
Key Takeaways:
- Whitewashing is a versatile DIY method to update a brick fireplace.
- Proper cleaning and preparation are essential for good adhesion.
- The paint-to-water ratio determines the opacity of the whitewash.
- Wiping back the excess paint is crucial for achieving the desired look.
- Layering allows for greater control over the final color and depth.
Why Choose Whitewashing for Your Brick Fireplace?
Before we get into the nitty-gritty, let’s explore why whitewashing has become such a popular choice for revamping brick fireplaces. Unlike a full paint job, whitewashing allows some of the brick’s natural texture and color variations to peek through, creating a charming, rustic, yet updated look.
It’s a versatile technique that can complement various interior design styles, from farmhouse chic to modern minimalist. Plus, it’s often a more forgiving and less permanent option than painting, making it a great choice for DIY enthusiasts.
Gathering Your Supplies: What You’ll Need
To embark on your whitewashing journey, you’ll need to gather a few essential supplies. Having everything on hand before you begin will ensure a smoother and more enjoyable process. Here’s a checklist:
- Cleaning Supplies:
- Stiff-bristled brush (wire brush for stubborn areas)
- Mild soap or detergent
- Water
- Sponges or rags
- Drop cloths or painter’s plastic
- Whitewashing Mixture:
- Latex paint (matte or flat sheen recommended)
- Water (for diluting the paint)
- Mixing container
- Stir sticks
- Application Tools:
- Paintbrushes (various sizes, including a wide brush for larger areas and smaller brushes for details)
- Paint roller (optional, for larger, flatter surfaces)
- Spray bottle with water (optional, for dampening the brick)
- Clean rags or cloths (for wiping back the wash)
- Safety Gear:
- Gloves
- Eye protection
- Respirator or dust mask (especially if dealing with very dusty brick)
Step-by-Step Guide: Whitewashing Brick Fireplace
Now, let’s get down to the actual process. Follow these steps carefully for a beautiful, professional-looking result.


Step 1: Thoroughly Clean the Brick
A clean surface is crucial for proper adhesion of the whitewash. Use a stiff-bristled brush and a solution of mild soap and water to scrub away any dirt, dust, soot, or grime.
For stubborn stains, a wire brush might be necessary. Rinse the brick thoroughly with clean water and allow it to dry completely – this could take several hours or even overnight.
Step 2: Prepare Your Work Area
Protect the surrounding areas from paint splatters by laying down drop cloths or painter’s plastic. This includes the floor in front of the fireplace and any nearby walls or furniture.
Step 3: Mix Your Whitewash Solution
The key to a successful whitewash is the paint-to-water ratio. This will determine the opacity of the wash. A common starting point is a 1:1 ratio (equal parts paint and water), but you can adjust this based on your desired look. For a more transparent wash, use more water; for a more opaque look, use less.
Mix the paint and water thoroughly in your container until the mixture is smooth and consistent.
Whitewash Opacity Guide Table
| Paint : Water Ratio | Opacity Level | Look |
|---|---|---|
| 1 : 2 | Very Sheer | Subtle color change, lots of brick showing |
| 1 : 1 | Medium Sheer | Noticeable color change, some brick detail |
| 2 : 1 | Semi-Opaque | Significant color change, less brick detail |
Step 4: Dampen the Brick (Optional but Recommended)
Lightly dampening the brick with a spray bottle of water before applying the whitewash can help the mixture spread more evenly and prevent it from drying too quickly, giving you more time to work.
Step 5: Apply the Whitewash
Using your chosen paintbrush or roller, apply the whitewash mixture to the brick in even strokes. Work in manageable sections. Don’t worry about perfect coverage at this stage.
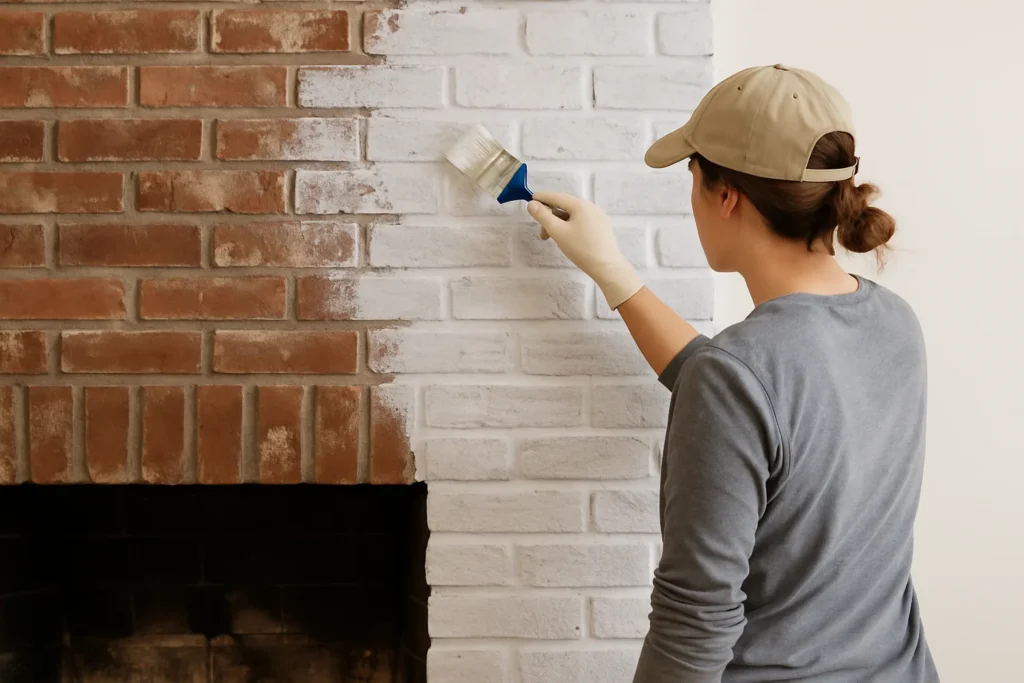
Step 6: Wipe Back the Excess
This is where the magic happens! While the whitewash is still wet (usually within a few minutes of application), use a clean rag or cloth to gently wipe back some of the paint.


The amount you wipe back will determine the final look. For a more rustic feel, wipe back more paint, allowing more of the brick’s original color and texture to show through. For a more solid look, wipe back less.
Experiment with different amounts of pressure and wiping techniques to achieve your desired effect.
Step 7: Layering for Depth (Optional)
If you want to build up the color or create more variation, you can apply a second or even a third thin layer of whitewash after the first layer has dried completely. Remember to wipe back each layer as desired.
Step 8: Let It Dry Completely
Allow the whitewashed brick to dry thoroughly before enjoying your newly transformed fireplace. Drying time will vary depending on the humidity and the thickness of the application.
Troubleshooting Common Fireplace Whitewashing Issues
Even with careful planning, you might encounter a few hiccups along the way. Here are some common issues and how to address them:
- Uneven Coverage:
- Ensure you are applying the whitewash evenly and wiping back consistently. If you have areas that look too heavy or too light, you can try lightly re-wetting the area and blending it with a clean brush or rag.
- Whitewash Drying Too Quickly:
- If the whitewash is drying too fast, especially in warm weather, try working in smaller sections and dampening the brick more thoroughly beforehand. You can also add a small amount of paint extender to your mixture (follow the manufacturer’s instructions).
- Not Enough Brick Showing:
- If you’ve applied too much whitewash, you can try gently scrubbing the surface with a damp sponge or rag while the paint is still relatively fresh.
- Too Much Brick Showing:
- If you haven’t achieved the desired level of opacity, allow the first coat to dry completely and apply a second, thinner coat.
Styling Your Newly Whitewashed Fireplace
Once your whitewashed brick fireplace is dry, it’s time to style it and make it a focal point of your room! Consider these ideas:
- Add decorative items to your mantel, such as candles, vases, artwork, and seasonal accents.
- Place a stylish rug in front of the hearth to add warmth and texture.
- A decorative fireplace screen can enhance the aesthetic and add a touch of elegance.
- Hang artwork or a mirror above the mantel to complete the look.
Design Styles Complementing Whitewashed Brick
| Design Style | Characteristics | Why Whitewashed Brick Works Well |
|---|---|---|
| Farmhouse Chic | Natural materials, rustic charm, light and airy | Enhances the natural texture, brightens the space |
| Modern Minimalist | Clean lines, neutral colors, simplicity | Adds subtle texture without being overwhelming |
| Coastal | Light colors, natural elements, relaxed feel | Creates a breezy, beachy vibe |
| Scandinavian | Functionality, simplicity, light and bright | Complements the clean aesthetic |
FAQs
Is whitewashing brick permanent?
While whitewashing creates a lasting finish, it’s less permanent than traditional paint. With some effort, it can be removed or altered, especially if a sealant wasn’t applied.
Do I need to seal the whitewashed brick?
Sealing is optional but recommended, especially if the fireplace is frequently used or if you want to protect the whitewashed finish from stains and dust. Use a matte or low-sheen sealant specifically designed for masonry.
Can I whitewash a painted brick fireplace?
Yes, but the preparation will be more involved. You’ll need to ensure the existing paint is clean and properly adhered. Lightly sanding the surface can help the whitewash grip better.
What type of paint should I use for whitewashing?
Latex paint with a matte or flat sheen is generally recommended for whitewashing brick fireplaces. Avoid glossy paints as they can look less natural.
How long does it take to whitewash a brick fireplace?
The total time will depend on the size of your fireplace and the number of coats you apply. Allow for cleaning time, application time for each coat, and drying time in between. It can typically be completed in a weekend.
Will whitewashing affect the fireplace’s ability to function?
No, as long as you are only applying the whitewash to the exterior brick surfaces and not inside the firebox or on any mechanical components.
Final Thoughts
Whitewashing your brick fireplace is a rewarding DIY project that can dramatically transform the look and feel of your living space.
By following these secrets and taking your time, you can achieve a perfectly stunning result that you’ll enjoy for years to come. So, gather your supplies, embrace the process, and get ready to fall in love with your fireplace all over again!
Affiliate Disclosure: Fireplaceadviser.com is a participant in the Amazon Services LLC Associates Program. We may earn a commission when you click on certain links on this site and purchase.

Hello!! I am Jamal Khan. I often fix my home electric heaters and gas stove problems and research the common issues in the heating units to improve my knowledge and expertise. The aim of establishing fireplaceadviser.com is to share my expertise and knowledge with my audience.